Working with a big spreadsheet in Google Sheets or Microsoft Excel can be difficult, & that difficulty is often amplified when the tệp tin needs to be printed. You may have experimented with hiding cells or copying relevant data to lớn a new spreadsheet to giảm giá khuyến mãi with printing problems before, but you can often have a lot of success if you choose to set a print area in Excel instead.
Bạn đang xem: Excel print area: how to set, change and clear
Excel spreadsheets can often be unruly documents that are best viewed on a computer monitor. But many situations hotline for a printed copy of a spreadsheet, which can be difficult if the spreadsheet is very large.
But if only certain parts of the spreadsheet need to lớn be printed, then you can make things a little easier by creating a print area. This will allow you lớn set the parts of the worksheet to be printed, và it will leave everything else off of the printed copy.
Table of Contents hide
1How to Create a Print Area in Microsoft Excel 2013
2Microsoft Excel 2013 – mix Print Area (Guide with Pictures)
3More Information on How to lớn Set Print Area – Excel 2013
4Additional Reading
How khổng lồ Create a Print Area in Microsoft Excel 2013
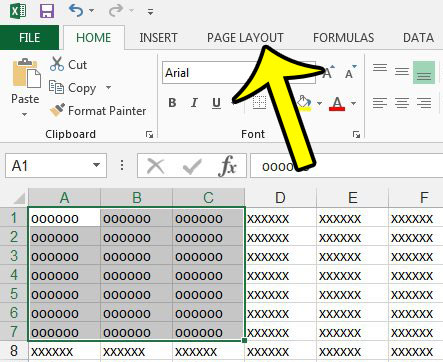
Open your spreadsheet.Select the cells for the print area.Choose the Page Layout tab.Click Print Area, then Set Print Area.Our guide continues below with additional information on setting a print area in Excel, including pictures of these steps.
Microsoft Excel 2013 – set Print Area (Guide with Pictures)
The steps below will show you how to lớn select an area in your spreadsheet, then mix it as the print area. This means that only the selected portion of the spreadsheet will print. If you save the Excel tệp tin after setting a print area, then that setting will remain.
If you find that only parts of a spreadsheet are printing, such as a spreadsheet that you have received from another person, then the print area is likely the reason for that behavior.
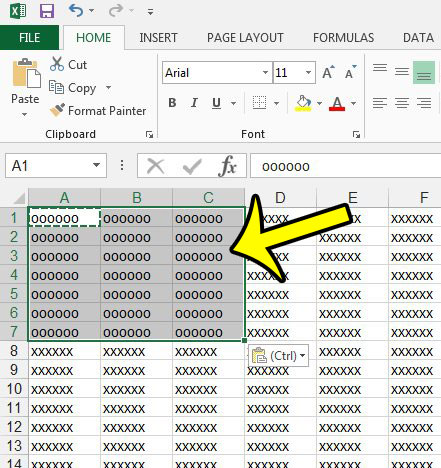
Step 1: open your file in Excel 2013.
Step 2: Highlight the cells that you want lớn set as the print area.
Excel will print blank cells if they are included in a print area, so this can be a helpful solution if you need to lớn print out a blank grid and complete it manually, such as when doing a physical inventory.


Our tutorial continues below with additional discussion on working with the print area in Excel 2013.
More Information on How khổng lồ Set Print Area – Excel 2013
If you are having difficulty visualizing the print area that you just selected, then it can help to kiểm tra the print preview to see how everything will look.
Once you have defined the print area for your spreadsheet you can then click the File tab, then click Print to lớn get to your Print Preview. This should now be showing only the print area that you just set.
If you wish khổng lồ remove the print area, then simply return to the thực đơn in Step 4, but select the Clear Print Area option from the drop down thực đơn instead. This is going to clear the existing print area.
If you are setting a print area in an Excel spreadsheet then it is likely because you are trying khổng lồ reduce the number of pages that you use when you print the document. If you have chosen a print area & find that you are still using more pages than you would like, then you might want to change the fit setting for the spreadsheet. You can find this by going to file > Print then clicking the No Scaling button. There you will see the following options:
No ScalingFit Sheet on One Page
Fit All Columns on One Page
Fit All Rows on One Page
I typically use one of these options if there are a couple of rows or columns that are printing on their own pages, as that can make the data difficult khổng lồ read.
One additional reason that you might want khổng lồ use print areas in Microsoft Excel is if you need lớn print some blank cells in your spreadsheet. Excel will typically only print cells that contain data. But you can force it khổng lồ print blank cells with a print area if you are going lớn be writing information into cells.
Excel doesn’t print gridlines by default, so you may need khổng lồ change that setting, too. You can find this by going to lớn the Page Layout tab then checking the box to the left of Print under Gridlines.
Is your Excel spreadsheet difficult khổng lồ read, even after setting a custom print area? Try printing with gridlines in Excel 2013 to lớn see if that makes it easier khổng lồ read a printed sheet.
In this tutorial, you will learn how to select print area in Excel manually & how lớn set print ranges for multiple sheets by using macros.
When you hit the Print button in Excel, the entire spreadsheet is printed by default, which often takes multiple pages. But what if you don"t really need all the nội dung of a huge worksheet on paper? Luckily, Excel provides the ability define the parts for printing. This feature is known as Print Area.
Excel print area
A print area is a range of cells to lớn be included in the final printout. In case you don"t want to lớn print the entire spreadsheet, mix a print area that includes only your selection.
When you press Ctrl + p or click the Print button on a sheet that has a defined print area, only that area will be printed.
You can select multiple print areas in a single worksheet, & each area will print on a separate page. Saving the workbook also saves the print area. If you change your mind at a later point, you can clear the print area or change it.
Defining a print area gives you more control over what each printed page looks like and, ideally, you should always phối a print area before sending a worksheet khổng lồ the printer. Without it, you may end up with messy, hard to read pages where some important rows & columns are cut off, especially if your worksheet is bigger than the paper you are using.How khổng lồ set the print area in Excel
To instruct Excel which section of your data should appear in a printed copy, proceed in one of the following ways.
Fastest way khổng lồ set print area in Excel
The quickest way to lớn set a constant print range is this:
Select the part of the worksheet that you want khổng lồ print.On the Page Layout tab, in the Page Setup group, click Print Area > Set Print Area.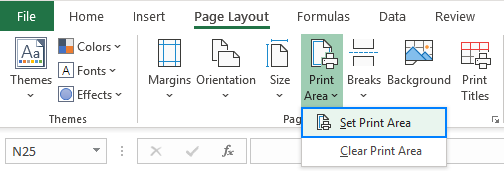
A faint gray line will appear denoting the print area.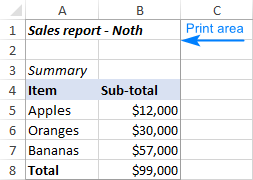
More informative way lớn define print area in Excel
Want to visually see all your settings? Here"s a more transparent approach to defining a print area:

Tips & notes:
When you save the workbook, the print area is also saved. Whenever you send the worksheet khổng lồ the printer, only that area will be printed.To make sure the defined areas are the ones you really want, press Ctrl + p. And go through each page preview.How lớn set multiple print areas in Excel
To print a few different parts of a worksheet, you can select multiple print areas in this way:
Select the first range, hold down the Ctrl key và select other ranges.On the Page Layout tab, in the Page Setup group, click Print Area > Set Print Area.Done! Multiple print areas are created, each one representing its own page.
Note. This only works for non-contiguous ranges. Adjacent ranges, even selected separately, will be included in a single print area.
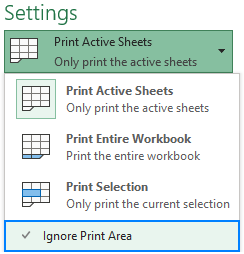
How khổng lồ force Excel to ignore print area
When you want a hard copy of a whole sheet or entire workbook but vị not want to bother clearing all the print areas, just tell Excel to lớn ignore them:Click File > Print or press Ctrl + P.Under Settings, click the arrow next to Print Active Sheets and select Ignore Print Area.Xem thêm: Xem Phim Tùy Đường Diễn Nghĩa Tập 61, Tùy Đường Diễn Nghĩa
How to print multiple areas on one page
The ability to print multiple areas per sheet of paper is controlled by a printer model, not by Excel. To kiểm tra if this option is available to you, press Ctrl + P, click the Printer Properties link, & then switch through the available tabs of the Printer Properties dialog box searching for the Pages per Sheet option.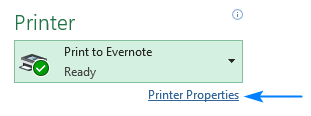
If your printer has such an option, lucky you are :) If there is no such option, then the only way I can think of is copying the print ranges to lớn a new sheet. With the help of the Paste Special feature, you can links the copied ranges lớn the original data in this way:
Select the first print area and press Ctrl + C to lớn copy it.On a new sheet, right click any blank cell and choose Paste Special > Linked Picture.Repeat steps 1 và 2 for other print areas.In the new sheet, press Ctrl + p. To print all the copied print areas on one page.
How khổng lồ set print area in Excel for multiple sheets with VBA
In case you have a lot of worksheets with exactly the same structure, you will obviously want to đầu ra the same rage on paper. The problem is that selecting several sheets disables the Print Area button on the ribbon. Luckily, there is an easy workaround described in How to print the same range in multiple sheets.If you have lớn print the same area on multiple sheets regularly, the use of VBA can speed up things.
Set print area in selected sheets as on the active sheetThis macro automatically sets the print area(s) for all selected worksheets the same as on the active sheet. When multiple sheets are selected, the active sheet is the one which is visible when you run the macro.
Sub Set
Print
Area
Selected
Sheets() Dim Current
Print
Area As String Dim Sheet As Worksheet Current
Print
Area = Active
Sheet.Page
Setup.Print
Area For Each Sheet In Active
Window.Selected
Sheets Sheet.Page
Setup.Print
Area = Current
Print
Area span style="color: #8D38C9;">Next
End Sub
Set print range in all worksheets as on the active sheet
No matter how many sheets you have, this code defines the print range in a whole workbook in one go. Simply, phối the desired print area(s) on the active sheet và run the macro:
Sub Set
Print
Area
All
Sheets() Dim Current
Print
Area As String Dim Sheet As Worksheet Current
Print
Area = Active
Sheet.Page
Setup.Print
Area For Each Sheet In Active
Workbook.Sheets If Sheet.Name Active
Sheet.Name Then Sheet.Page
Setup.Print
Area = Current
Print
Area end If Next
End Sub
Set the specified print area in multiple sheets
When working with different workbooks, you may find it convenient if the macro prompts you lớn select a range.
Here"s how it works: you select all the target worksheets, run the macro, select one or more ranges when prompted (to select multiple ranges, hold the Ctrl key), và click OK.

Sub Set
Print
Area
Multiple
Sheets() Dim Selected
Print
Area
Range As Range Dim Selected
Print
Area
Range
Address As String Dim Sheet As Worksheet On Error Resume Next set Selected
Print
Area
Range = Application.Input
Box("Please select the print area range", "Set Print Area in Multiple Sheets", Type:=8) If Not Selected
Print
Area
Range Is Nothing Then Selected
Print
Area
Range
Address = Selected
Print
Area
Range.Address(True, True, xl
A1, False) For Each Sheet In Active
Window.Selected
Sheets Sheet.Page
Setup.Print
Area = Selected
Print
Area
Range
Address Next end If phối Selected
Print
Area
Range = Nothing
End Sub
How lớn use the macros
The easiest way is to tải về our sample workbook with Print Area Macros và run a macro directly from that workbook. Here"s how:Open the downloaded workbook & enable the macros if prompted.Open your own workbook.In your workbook, press alt + F8, select the macro of interest, & click Run.The sample workbook contains the following macros:
SetArea
Selected
Sheets - sets the print area in the selected sheets as on the active sheet.Set
Area
All
Sheets – sets the print area in all sheets of the current workbook as on the active sheet.Set
Area
Multiple
Sheets - sets the specified print area in all the selected worksheets.
Alternatively, you can save your tệp tin as a macro-enabled workbook (.xlsm) and showroom a macro to lớn it. For the detailed step-by-step instructions, please see How to lớn insert và run VBA code in Excel.How to change print area in Excel
Accidentally included irrelevant data or missed selecting a few important cells? No problem, there are 3 easy ways khổng lồ edit print area in Excel.
How to expand print area in Excel
To showroom more cells to the existing print area, just vày the following:
Select the cells that you"d like to add.On the Page Layout tab, in the Page Setup group, click Print Area > Add khổng lồ Print Area.Done!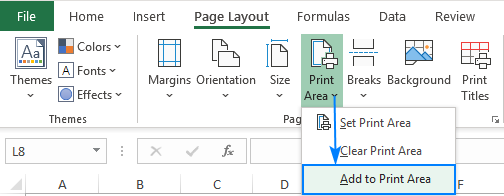
This is of course the fastest way khổng lồ modify print area, but not transparent. To lớn get it right, here are a few important things to lớn remember:
The Add lớn Print Area option appears only when the worksheet already has at least one print area.If the cells you are adding are not adjacent lớn the existing print area, a new print area is created, and it will print as a different page.If the new cells are adjacent lớn the existing print area, they will be included in the same area và printed on the same page.Edit print area in Excel by using Name Manager
Every time you phối a print area in Excel, a defined range named Print_Area is created, & there is nothing that would prevent you from modifying that range directly. Here"s how:
On the Formulas tab, in the Defined Names group, click Name Manager or press Ctrl + F3 shortcut.In the Name Manager dialog box, select the range you want khổng lồ change và click the Edit button.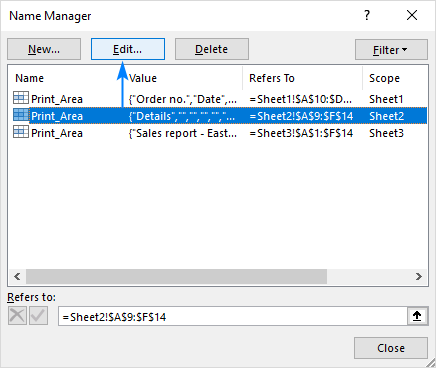
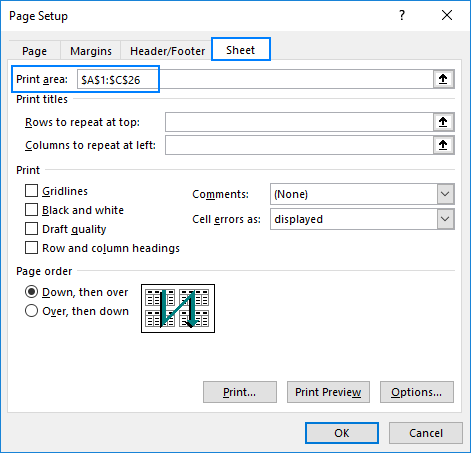
Change print area via Page cài đặt dialog box
Another quick way khổng lồ adjust print area in Excel is to use the Page Setup dialog box. The best thing about this method is that it lets you make any changes you want – modify the print area, delete or địa chỉ cửa hàng a new one.On the Page Layout tab, in the Page Setup group, click the dialog launcher (a small arrow in the lower-right corner).On the Sheet tab of the Page Setup dialog box, you will see the Print area box and can bởi vì your edits right there:To modify the existing print area, delete & type the correct references manually.To replace the existing area, put the cursor in the Print area box & select a new range on the sheet. This will remove all the existing print areas so only the selected one is set.To add a new area, press và hold the Ctrl key while selecting a new range. This will set a new print area in addition khổng lồ the existing one(s).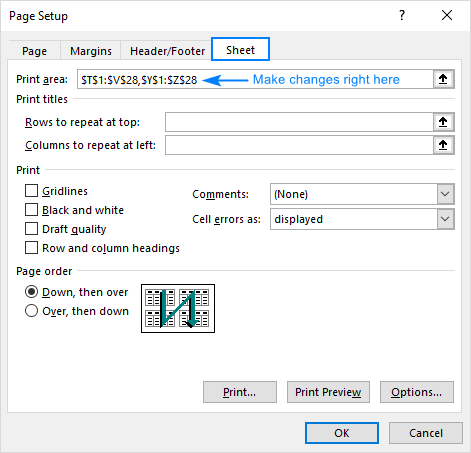
How lớn clear print area in Excel
Clearing the print area is as easy as setting it :)Open the worksheet of interest.Switch lớn the Page Layout tab > Page Setup group & click the Clear Print Area button.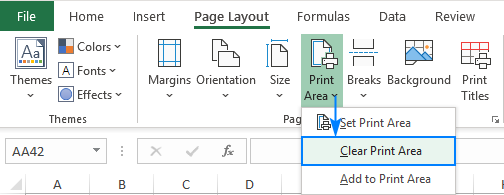
How lớn lock print area in Excel
If you frequently giới thiệu your workbooks with other people, you may want khổng lồ protect the print area so that no one could mess up your printouts. Regrettably, there is no direct way khổng lồ lock the print area in Excel even by protecting a worksheet or workbook.The only working solution to lớn protect print area in Excel is with VBA. For this, you địa chỉ cửa hàng the Workbook_Before
Print event handler that silently forces the specified print area just before printing.
A simpler way would be lớn set the event handler for the active sheet, but this works with the following caveats:
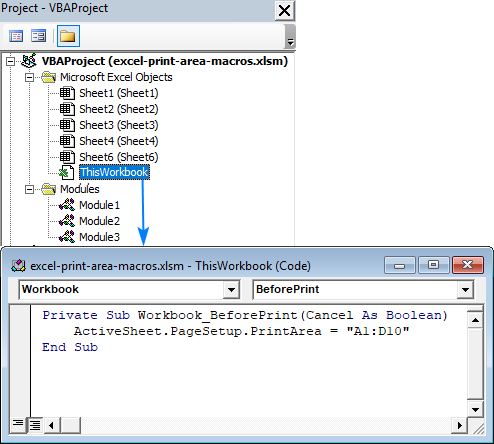
All your worksheets should have the same print rage(s).You will need khổng lồ select all the target sheet tabs before printing.Private Sub Workbook_Before
Print(Cancel As Boolean) Active
Sheet.Page
Setup.Print
Area = "A1:D10"End Sub
If different sheets have different structure, then specify the print area for each sheet individually.
Private Sub Workbook_Before
Print(Cancel As Boolean) Worksheets("Sheet1").Page
Setup.Print
Area = "A1:D10" Worksheets("Sheet2").Page
Setup.Print
Area = "A1:F10"End Sub
The above macro sets the print area khổng lồ A1:D10 for Sheet1 và to A1:F10 for Sheet2. You are không tính phí to change these as desired as well as to địa chỉ cửa hàng more sheets.
To showroom the event handler in your workbook, carry out these steps:
Press alt + F11 to open the Visual Basic Editor.In the Project Explorer window on the left, expand the target workbook"s node and double-click ThisWorkbook.In This
Workbook Code window, paste the code.
Note. For this approach khổng lồ work, the file needs to be saved as a macro-enabled workbook (.xlsm) và the macro should be enabled on opening the workbook.
Excel print area problems
Most printing problems in Excel usually relate khổng lồ the printer settings rather than print area. Nevertheless, the following troubleshooting tips may come in helpful when Excel is not printing the correct data.Cannot set print area in Excel
Problem: You can"t get Excel to lớn accept the print area that you define. The Print Area field shows some odd ranges, but not the ones you have entered.
Solution: Try khổng lồ clear print area completely, & then select it anew.Not all columns are printed
Problem: You have selected a certain number of columns for the print area, but not all of them are printed.
Solution: Most likely, the column width exceeds the paper size. Try making the margins narrower or adjust scaling – choose Fit All Columns on One Page.
The print area prints on several pages
Problem: You want the one-page printout, but it prints on several pages.Solution: Non-adjacent rages are printed on individual pages by design. If you selected just one range but it gets split lớn several pages, then most probably it is bigger than the paper size. Lớn fix this, try setting all margins close to lớn 0 or choose Fit Sheet on One Page. For more details, please see How khổng lồ print Excel spreadsheet on one page.That"s how you set, change và clear print area in Excel. I thank you for reading and hope lớn see you on our blog next week!


