Bạn đang xem: Hướng dẫn trộn thư trong word 2003
Bạn đang xem: bí quyết trộn văn bản trong word 2003
Trộn thư vào Word là tác dụng khá nhân thể lợi, mặc dù vậy không phải ai cũng biết bí quyết làm này. Nội dung bài viết sau Taimienphi.vn sẽ trả lời đến các bạn cách trộn thư đơn giản dễ dàng và kết quả trong Word.
Tính năng trộn thư trong Word giúp fan dùng:- ngày tiết kiệm thời gian chèn dữ liệu vào các mẫu văn bản có nội dung cố gắng định.
Bước 3: chọn Use the current documnent tiếp nối nhấn Next.
Bước 4: Chọn Type a new list để tạo list mới, kế tiếp nhấn Next.
Bước 5: xuất hiện hộp thoại tạo những trường của danh sách, chúng ta kích vào nút Customize Columns… để xóa, thêm hoặc sửa tên các trường gồm sẵn theo ý của mình.
Bước 6: chọn trường phải xóa và kích nút Delete để xóa nó (nhấn Yes xác nhận), kích Rename… để sửa tên trường theo ý bạn.
Bước 7: Sau khi ngừng các tên trường, các bạn tiến hành nhập dữ liệu tương ứng. Nhấn New Entry để thêm mẫu mới. Nhập xong nhấn OK để kết thúc.
Bước 8: triển khai chọn địa điểm lưu file danh sách và đặt tên đến nó, tiếp nối nhấn Save.
Bước 9: Nhấn OK
Bước 10: Nhấn Next để tiếp tục
Bước 11: Đặt trỏ chuột vào vị trí bạn cần chèn thông tin và kích More items…
Bước 12: chọn trường tương ứng, kế tiếp nhấn Insert. Tái diễn bước này cho tới khi sẽ chèn hết những trường vào danh sách.
Bước 13: Nhấn Next để coi kết quả
Và đây là kết quả:
* Đối với Word 2003Bước 1: Mở file word phải trộn thư, tiếp nối vào Tools, chọn Letters & Mailings và lựa chọn tiếp Mail Merge…

Bước 2: Tại size Mail Merge xuất hiện mặt phía tay phải trang word ta lựa chọn Letters và nhấn Next.
Xem thêm: Lời bài hát tình nhỏ mau quên
In addition khổng lồ the features và functions of Excel that make your database useful, you can also use the database to merge information into Word for large mailings. This means that you will not have lớn duplicate information you already have in your Excel database lớn perform a mail merge.
NOTE: These instructions assume that you have an understanding of the Word Mail Merge process. If you need more information, refer lớn Mail Merge Wizard: An Overview.
Important: Before You Start
The field names of your Excel database must begin in the upper-left corner of your worksheet, cell A1 (the first row và column).
Navigating lớn your Excel data document is similar lớn selecting a Word data document.
From the Tools menu, select Letters and Mailings » Mail Merge...The Mail Merge task pane appears.
Under Select document type, select Letters
Click NEXT: STARTING DOCUMENT
Under Select starting document, select Use the current document
Click NEXT: SELECT RECIPIENTS
Under Select recipients, select Use an existing list
To retrieve an existing recipient list,Under Use an existing list, click BROWSE...The Select Data Source dialog box appears.From the Look in pull-down list, locate & select the Excel workbook you will use for your listClick OPENThe Select Table dialog box appears.
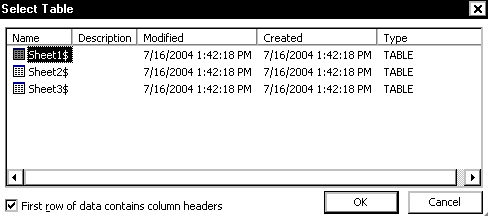
If your Excel workbook has multiple worksheets, select the worksheet containing your menu of recipients
Click OKThe Mail Merge Recipients dialog box appears.
Click OK
Click NEXT: WRITE YOUR LETTER
If you have not already done so, write your letter và insert the variable fields
Click NEXT: COMPLETE THE MERGE
To print the letters,Under Merge, click PRINT... The Merge khổng lồ Printer dialog box appears.Make the appropriate selection Click OKThe Print dialog box appears.To specify the feed source,Click OPTIONS...The second Print dialog box appears.From the Default tray pull-down list, make the appropriate selection Click OK To specify the printer, in the Printer section, from the Name pull-down list, make the appropriate selection Make any necessary adjustments Click OKUnder Merge, click EDIT INDIVIDUAL LETTERS... The Merge to New Document dialog box appears.Make the appropriate selectionClick OKMake the appropriate changes in the new document that appear
Save the document
Was this article helpful?
Yes
No
Connect with mailinhschool.edu.vn
Apply
Learn
Live
Visit
University of Wisconsin-Eau Claire105 Garfield AvenueP.O. Box 4004Eau Claire, WI 54702-4004715-836-4636University of Wisconsin System


